

Tactical Boots have been used for the people in the line of duty forever. The marines, police, army, and airforce have all depended on the sturdiness and strength that tactical boots give them.
These boots protect the feet from unpredictable weather conditions and unstable or rugged roads.
However, the stability or support provided by tactical boots depends upon how they are laced. The method of lacing is what allows the boots to feel comfortable.
The sections below discuss why different lacing methods are needed and how they can help with wearing tactical boots for different purposes.
Quick Navigation
Why Are Lacing Tactical Boots Properly Important?
Tactical boots provide long term stability and keep the feet comfortable. But for this to happen, the lacing needs to be tight.
Listed below are several reasons why tactical boots need to be laced properly.

- Line of Duty
During an emergency, army men need to put on their boots quickly. Tactical boots can be laced up very fast and tightened according to their preferences.
Certain tactical boots also have extra padding to offer comfort during extreme weather conditions.
The boots need to be laced properly so that they can be worn in the line of duty without changing frequently.
- Good for Feet
Tactical boots are usually made of hardened leather and can be subjected to rough use. They also have a waterproof layer.
Nowadays, lacing tactical boots have nylon side panels. When laced properly, these provide ventilation, allowing the feet to breathe.
- Sturdiness
Lacing tactical boots can be worn on rugged terrain and allow marines or army men to have better grip.
Most of the time, these boots are worn on rugged terrain and they are only sturdy when correctly laced. These lacing tactical boots are durable and therefore, long-lasting.
- Support
In the line of duty, the lacing tactical boots need to provide extended support. These boots will need to take the weight of the entire body.
The laces can be tightened to provide enhanced ankle stability.
Read more: How To Tuck Tactical Pants into Boots?
How to Lace Tactical Boots for All-Day Walking?
The method of lacing tactical boots depends on several factors, including for what purpose the boots are going to be worn and in what condition.
There are many lacing methods and some are suitable for light work or training while the others are more appropriate for combat. These methods have been discussed in detail below.
Read more: How To Blouse Tactical Boots?
1. Standard Criss-Cross

This is the simplest method of lacing tactical boots. It can be used when the boots are being worn on a walk.
Follow the steps below to lace-up tactical boots using this method.
Step 1: Take the two ends of the lace and pull them through the first pair of eyelets. The movement should be outwards.
Step 2: Now pull the right lace across and thread it through one eyelet above. Go underneath the eyelet and then pull the lace up.
Step 3: Take the left lace and cross it over the right. Pull it through one eyelet up. The movement should be from inside to outside.
Step 4: Repeat step 2 and 3 till you have threaded the laces through all eyelets.

Pros of Criss-Cross Lacing
- The lacing provides a comfortable fit.
- The method is very easy.
Cons of Criss-Cross Lacing
- The criss-cross lacing is not suitable for traditional combat boots.
- The process is time-consuming.
The criss-cross lacing of tactical boots is suitable for training purposes. But it does not provide enough stability during combat.
2. X Lacing
This method of lacing is similar to the traditional or standard criss-cross method. However, there are a few changes to the threading of the laces.
These have been given in the steps below.
Step 1: Take the two lace ends and go underneath the first two eyelets at the bottom. Pull the laces outwards through the eyelets.
Step 2: Cross the laces and thread them through the next eyelets. This time, the movement should be from outside to inside.
Step 3: Now cross the laces again. Then, pull them through the next pair of eyelets. The movement should be from inside to outside.
Step 4: Repeat steps 2 and 3 and take turns the threading movement, till you reach the top. This will give an X pattern to the laces threaded between each pair of eyelets.
Pros of X Lacing
- This method reduces friction and wear and tear of the laces.
- The lacing can be adjusted easily.
Cons of X Lacing
- Not very easy to do if there are an even number of eyelet pairs.
- The method is not suitable for rough use.
The X lacing method of tactical boots is durable and can be worn during training.
X laced boots can also be worn during any weather conditions as long as the lacing is done properly.
3. Bar Lacing
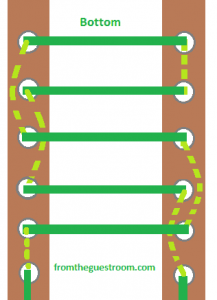
This is a very clean way of lacing tactical boots. You will not need to criss-cross the laces and the final look will be very straight and orderly.
Step 1: Pull the two ends of the lace straight through the two eyelets at the bottom, from outside to inside.
Step 2: Pull the right lace to the next eyelet and thread it from inside to outside. Then thread it through the eyelet across, from outside to inside.
Step 3: Take the left lace up and skip the eyelet that has the right lace. Pull it through the next eyelet outward. Then thread it through the eyelet across, from outside to inside.
Step 4: Now take the right lace and skip the eyelet with the left lace. Pull it through the following eyelet outward. Then again thread it to the eyelet across, from outside to inside.
Step 5: With an even number of eyelet pairs, continue with the previous two steps till the laces are threaded through all eyelets.
Step 6: If there is an odd number of eyelet pairs, then when you reach the top, one lace will have to be crossed and threaded inward through the next eyelet across (see the picture below). This will still maintain the clean look of the lacing.
Pros of Bar Lacing
- The lacing is very neat and tight.
- The lacing can be done easily with an even number of eyelet pairs.
Cons of Bar Lacing
- The laces cannot be adjusted easily.
- The method is quite complicated when there is an odd number of eyelet pairs.
The lacing being tight, can be used on waterproof boots while walking on rough roads. The boots will stay fit for a long time without you having to redo the lacing.
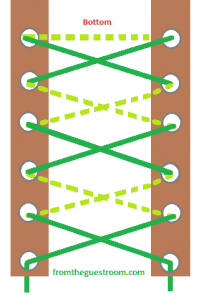
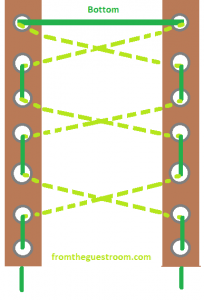
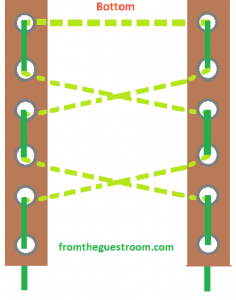
4. Ladder Lacing
As the name suggests, ladder lacing is a method that looks like a ladder when the laces are done up.
Details on how to do this lacing are given below.
Step 1: Pull the ends of the lace outward under the first eyelet pair at the bottom.
Step 2: Take the right lace (green) and thread it through the next eyelet, outside to inside. Do the same with the left lace (red) but keep both loose.
Step 3: Move the right lace across the left and go below the left lace that is covering the space between two eyelets. Then thread the right lace through the next eyelet, from outside to inside.
Step 4: Do the same with the left lace and repeat the whole procedure till you reach the top.
Pros of Ladder Lacing
- This lacing method provides extra stability to the tactical boots.
- The lacing stays tight for a long time.
Cons of Ladder Lacing
- The laces cannot be loosened or tightened quickly.
- The method is not efficient for tactical boots with few eyelets.
The ladder lacing can be used when the boots are worn for long hours and the laces need to stay tight.
The ladder lacing is usually used by paratroopers in the army.
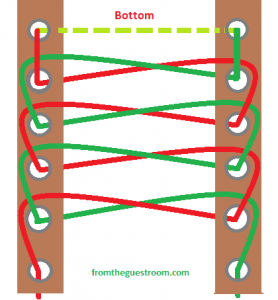
5. Army Lacing
The army lacing method is the most common. It is used by army men across the world, in various militaries.
The process of army lacing is listed below.
- For odd number:
Step 1: If the number of eyelet pairs is odd, pull the ends of the lace through the first two bottom eyelets inward.
Step 2: Take one lace and cross it diagonally. Pull it through the eyelet from underneath.
Step 3: Repeat the above step with the other lace.
Step 4: Pull the laces through the next eyelets, moving from the outside to the inside.
Step 5: Repeat the above three steps till you reach the top of the boot.
- For even number:
Step 1: If there is an even number of eyelet pairs, pull the ends of the lace through the first two bottom eyelets outward.
Step 2: Take each end of the lace and run straight up to the next eyelets, from outside to inside.
Step 3: Get one lace and cross it diagonally. Pull it through the eyelet, moving underneath it.
Step 4: Do the same with the other lace. The lacing through the bottom eyelets should be straight and then crossed for the eyelets above.
Step 5: Repeat the above three steps till you reach the top of the boot.
Pros of Army Lacing
- This lacing allows you to move your feet more freely.
- This method of lacing makes stiff tactical boots more wearable.
Cons of Army Lacing
- The laces cannot be tightened easily.
- The fit after using army lacing can feel quite loose.
Tactical boots made of hard leather are usually difficult to walk. The army lacing method makes them more flexible.
How to Lace Tactical Boots Tight?
The two methods ideal for lacing tactical boots tight are the bar lacing method and the ladder lacing method.
In bar lacing, the laces are threaded straight and not crisscrossed. In ladder lacing, the laces are threaded straight and then crisscrossed.
Both these lacing methods keep the laces tight for a long period.
How to Re-Lace Your Tactical Boots?
Re-lacing of tactical boots depends on how much has loosened.
If the laces have become loose through a few eyelets, you can re-lace just that part.
But if the entire lacing has loosened, then the easiest way to re-lace is by pulling the laces out and threading them again.
How to Lace Tactical Boots to Tighten Easier?
The X lacing method of lacing tactical boots can be adjusted and tightened easily.
The lacing is a criss-cross system and the threading of the laces is alternated between moving from inside to outside and then inside to outside of the eyelets.
How to Properly Lace Tactical Boots for Wide Feet?
For wide feet, the best way to lace tactical boots is the army lacing method. This lacing keeps the boots a little loose and allows flexible movement.
The standard criss-cross method or the X lacing method can also be used.
Final Words

The lacing of tactical boots, no matter what method is used, takes some time.
It is also important to check if both the laces are of the same length.
When you are deciding on a method of lacing for your tactical boots, it is important to test it.
Check how tight or loose it is and how easily it can be adjusted. If you can do that, then you will be able to find your right fit for tactical boots easily.